Quick Links
The time has finally come to solve the mystery of “the prototype” inZenless Zone Zero. After tracking down all of Belebog Industries' construction machines, you and your team are finally able to track down the long-lost prototype and begin to solve the mystery of Khor’s disappearance.
But all is not as it seems, for rubble and traps and even grander foes stand in the way of you and the truth. With a mission full of trials, tribulations and trauma, it’s best to get your best team together to delve into the depths of the Old Capital and defeat the robotic monster that may just hold the answers Koleda has been searching for.

How To Unlock The Trace To The Source Commission
The Trace to the Source commission can be unlocked at theend of Chapter Twoin Zenless Zone Zero, once youcomplete all of theprerequisite Belebog Industrycommissions.
Trace to the Source is the final Belebog Industries commission, and will be unlocked after youcomplete the Speedy Chaser commission. Once Speedy Chaser is complete, and once a few story beats play out, you can find the Trace to the Source Commission in the HDD.

How To Prepare For Trace To The Source
Trace to the Source is a high-difficulty commission in Zenless Zone Zero with arecommended Agent level of 28.
Electric and Ether attributeswill serve you well in the fights against enemies.

Luckily, there is not much you will need to prepare beforehand as you will have theoption to use the Belebog Agents as a Trial Teamfor this commission, and they will all be leveled appropriately.
You can toggle the “Trial Mode” button on the bottom-left of the Agent Select screen to use your own Agents. Know, though, thatyou can’t use Trial Agents alongside your own, so choose wisely before toggling!
If you choose to bring your own Agents, consider bringing Agents who caneasily target multiple enemies or large enemies. Inflicting Attribute Anomalies is also very handy for the final boss fight, sobringing your own Anomaly Agentis very helpful.
Graceis an excellent choice, as isNicole,for her Ether Attribute.
Entering The Hollow
When you first enter The Hollow for the Trace to the Source commission,the only direction you can go is left. Once the cutscene with Belebog Industries is completed, move left.verify you hit the bottom-right corner tileto unlock a hidden tile with a supply box in it.
Once youhit the brick wall, Fairy will prompt you to use the pile driver machine tobreak the brick wallso you may continue left. Keep moving towards the left side of the HDD until you find the magnifying glass tile.

Hitting the magifying glass tile willcause the screens in the HDD to expand upward, revealing a large square map with the boring machine and the grappling machine inside. From here,move up towards the “Sound Only” tileto begin the triangulation puzzle.
You’ll also collect your firstHollow Observation Dataset along the way!
How To Solve The Triangulation Puzzle
For the triangulation puzzle, you will begiven temporary control of the boring machine and the grappling machineso you cannavigate them across the map towards the glowing blue goal tiles.The catch is thatone machine can only handle bricks, while the other can only handle bombs.
For each machine, you can moveup, down, left or rightby moving your bangboo tile in those directions topush the red levers on the side of the screen.

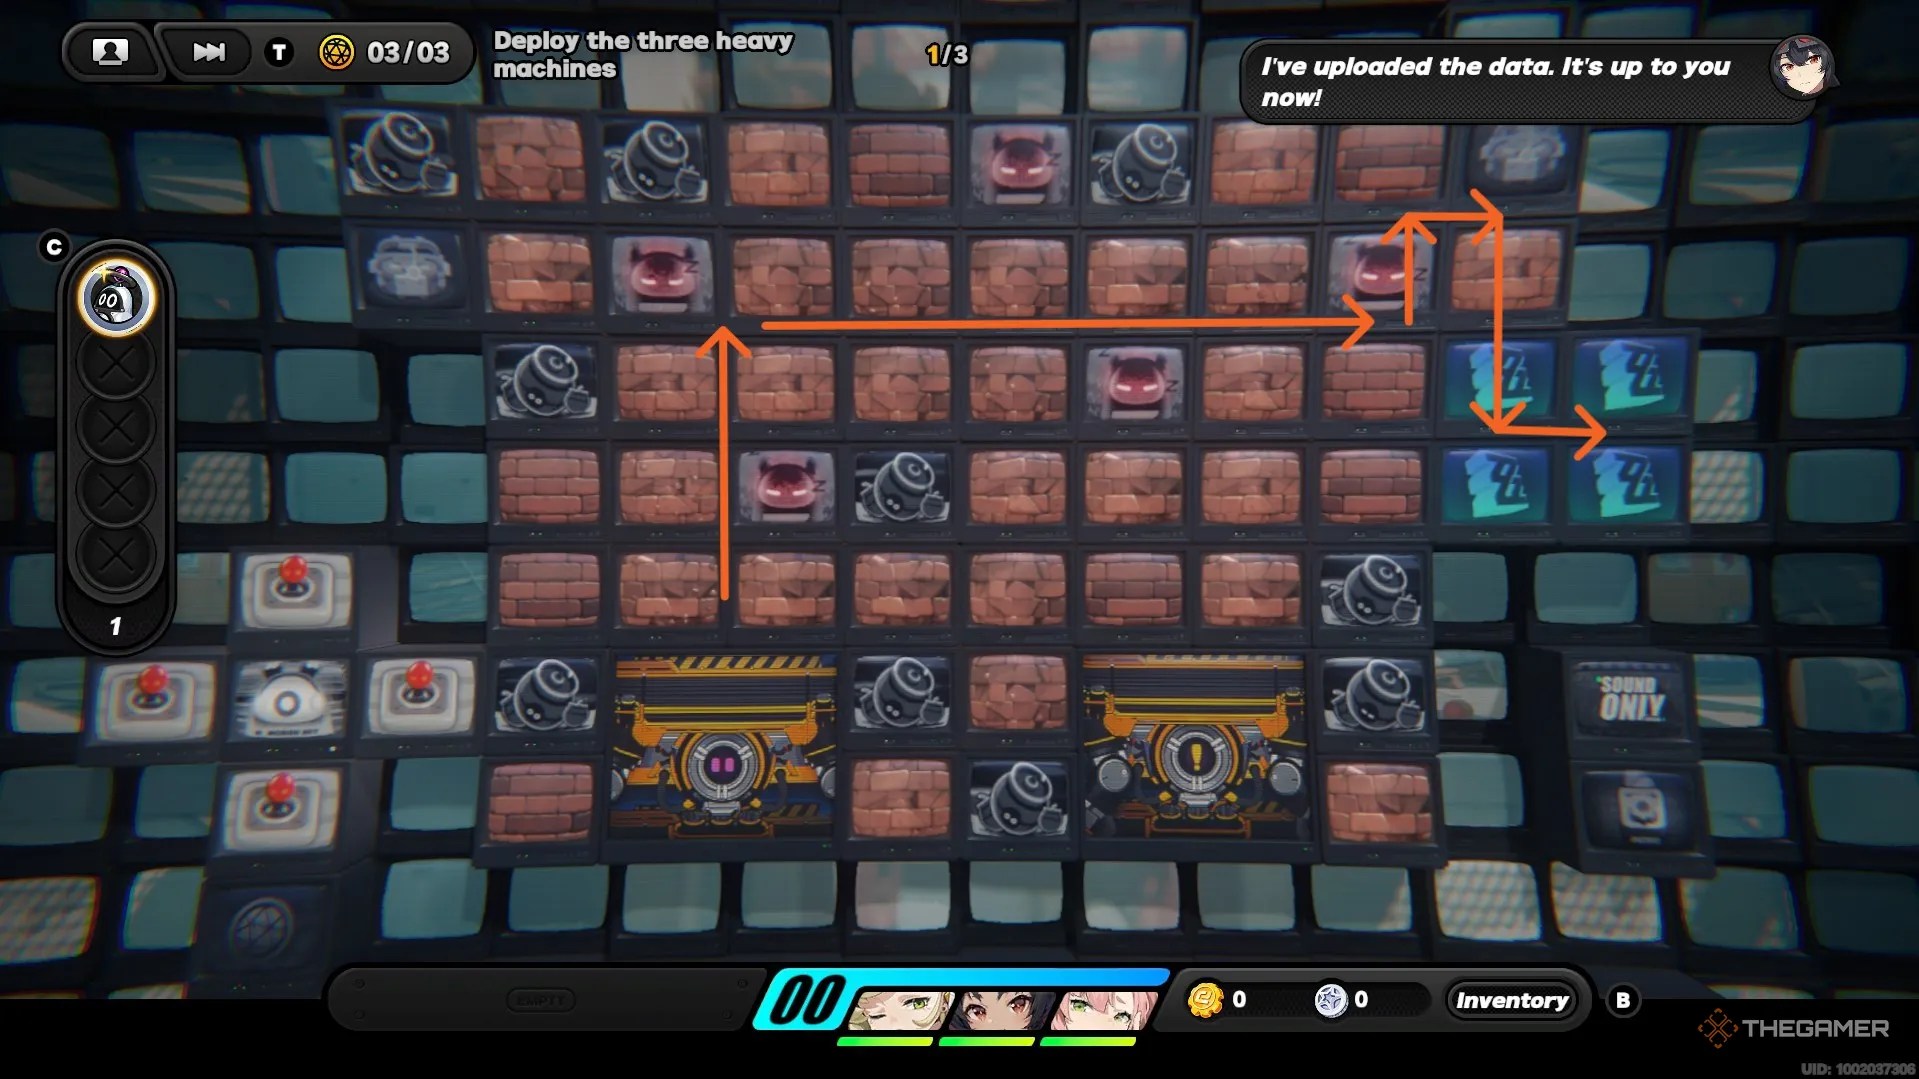
For the boring machine, you will want tomove directly upwards four times, thenmove right until you hit the edge of the screen. Be sure tomove up towards the top corner to claim the loot box, then down and right to reach the goal tiles.
Be sure to avoid bomb tiles at all costs while navigating as the boring machine. However, we do recommend hitting enemy tiles, as they reward you with extra Dennies upon collision.

For the grappling machine, you are going towant to hit as many bomb tiles as possibleto clear up the map - and because there are no repercussions. First, movedirectly left, then up towards the top of the map. Be sure not to hit the brick tile at the top of the screen, though!
You will find your second Hollow Observation Data on your way to the controls for the grappling machine.

From here,move left to claim the loot box, then down to the bomb tileto blow up the bricks in the way of the goal tiles. Move into the goal tiles to complete the triangulation puzzle and proceed with the commission.
Combat
Once the machines are in place, you will get a cutscene explaining thatGrace is being attacked by Ethereals. You will need to movedown and to the leftto find the Ethereal tile and rescue Grace.
This combat will come in four waves - three being lesser Ethereals and the final being a larger encounter with two Elite Ethereals.

Weaknesses: Ice, Ether
Resistances: None
None of the Belebog Industry members have Attributes that are effective against the Farbauri and Dullahan, so this combat may simply be a test of skill. If you brought your own team, though, consider using Nicole for her crowd control and Ether abilities.
When going against the two Elite Ethereals, you willwant to perform Dodges, since triggering them will prevent their powerful attacks. Since you are worrying about two targets at once,Dodges are better than Assists.
Once combat wraps up, you will see another cutscene before Grace explains thatshe has triangulated the location of the prototype.
Tracking Down The Prototype
With the location of the prototype revealed, aHollow Fissure tile will appear on the HDD screen. Navigating through this Hollow Fissure will take you down a level andreveal a twisting brick-line paththat leads to the prototype. First,go down and left to claim the final Hollow Observation Data, then up to heal and claim a loot box.
When you are ready to proceed,move left and up towards the prototype’s tile, and be ready for the fight of your life.
Weaknesses: Electric, Ether
The Unknown Corruption Complex is athree-stage boss fightthat comes at the end of the Trace to the Source Commission. With a huge frame, powerful repeating melee attacks and area of effect damages around its body, it can prove to be a difficult fight if you are unprepared.
If you brought along the Belebog crew as your Trial Team, you will want torely on Anton for damage and Ben for blocking attacks. Koleda can be a helpful switch in a pinch to inflict Stun, as well.
Rewards
For completing the Trace to the Source commission, you will receive:
You will also have completed the main story of Chapter Two, and can proceed with missions leading into the Chapter Two Intermission!
